
How to display images on a site
Let’s take a look at the common situation when Eonza is used as a website administration and control panel. For example, an administrator can add various photographs to the database, but how to display them on the website? Of course, you can implement this functionality yourself, but here is an example you can use at least as a starting point to your own solution. Below, we explain all actions you should take step by step to display a given picture to any user in a browser. For example, let’s take the online demo version of the Eonza system.
Step 1
Let’s suppose we query images using addresses of the form: http://demo.eonza.org/file/picture ID. So, we need to unpack eonza/tools/file.zip to the root directory of the website resulting in the file directory containing two files: index.php and .htaccess. Take a look at the following two lines of code in index.php
require_once $_SERVER['DOCUMENT_ROOT'].'/admin/conf.inc.php';
require_once $_SERVER['DOCUMENT_ROOT']."/eonza/app.inc.php";
Here we assume the Eonza system is installed in the eonza folder, and we can access the system at www.myeonzasite.com/admin/, where the conf.inc.php file must be located. If you use other directory names, you should specify them instead. In case of our demo site demo.eonza.org, the system is installed to the root directory and the two lines look like this:
require_once $_SERVER['DOCUMENT_ROOT'].'/conf.inc.php';
require_once $_SERVER['DOCUMENT_ROOT']."/app.inc.php";
Step 2
The Eonza information storage is designed so to prevent unauthorized access to date. This is also true for all supplemental scripts. That is why you should explicitly specify all tables images, of which are available to users. You need the id of the table for that. It is shown in the address bar when you view the table. For instance, the http://demo.eonza.org/#/table?id=7 address tells the current table it is 7. Then, add the conf.inc.php file to the $SHARE_FILES array and list all tables you want to open access to images in. At this step, we have finished the required configuration.
$SHARE_FILES = array( 7 );
Step 3
All data about files and photographs are stored in the enz_files table. For each file, it holds table identifier, field identifier and record identifier. The system doesn’t limit the number of files attached to the same field, so the request may produce several records as a result. For example, a query to fetch three images of a record may look as follows
$images = $db->getall("select id from enz_files where idtable=7 && iditem=?s limit 0,3", $iditem );
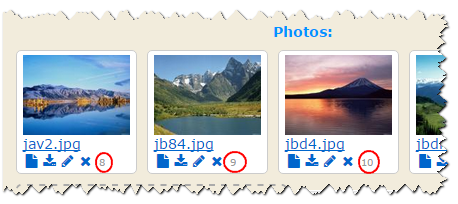
As for the storage, the code of an image or a file is printed in the bottom right corner of every file in the card view mode.
So, now we know the code of the image we want to display. What should be the image address format?
First, the extension part of the name is optional, but for the sake of clarity we will specify jpg. Second, we will put 123 as an identifier of the image, but you should put in your own values.
http://www.myeonzasite.com/file/123.jpg
If you put the address in such a format to the address bar of your browser, the browser offers to download the image. If you put such an address to the IMG HTML tag, the image is shown on the HTML page.
http://www.myeonzasite.com/file/i123.jpg
http://www.myeonzasite.com/file/any-text-string-123.jpg
In both cases, the image is displayed in a browser.
http://www.myeonzasite.com/file/t123.jpg
A thumbnail (preview) of the image, if any.
For example,
http://demo.eonza.org/file/my-best-foto-12.jpg
http://demo.eonza.org/file/i12
http://demo.eonza.org/file/t12.jpg
http://demo.eonza.org/file/12.photo
