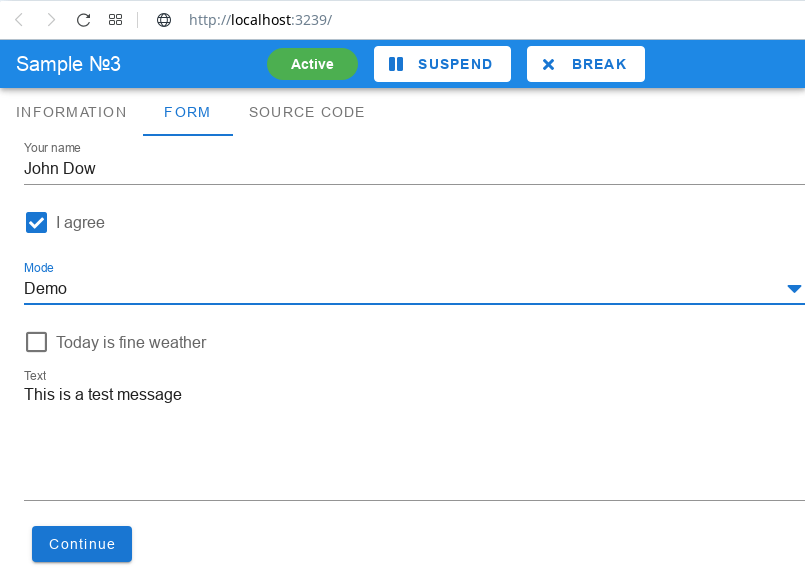
Form
The Form command allows you to show fields for data entry. It allows you to show input fields and checkboxes during script execution. Each element corresponds to a variable and displays its current value. The user can specify other values for the corresponding variable.
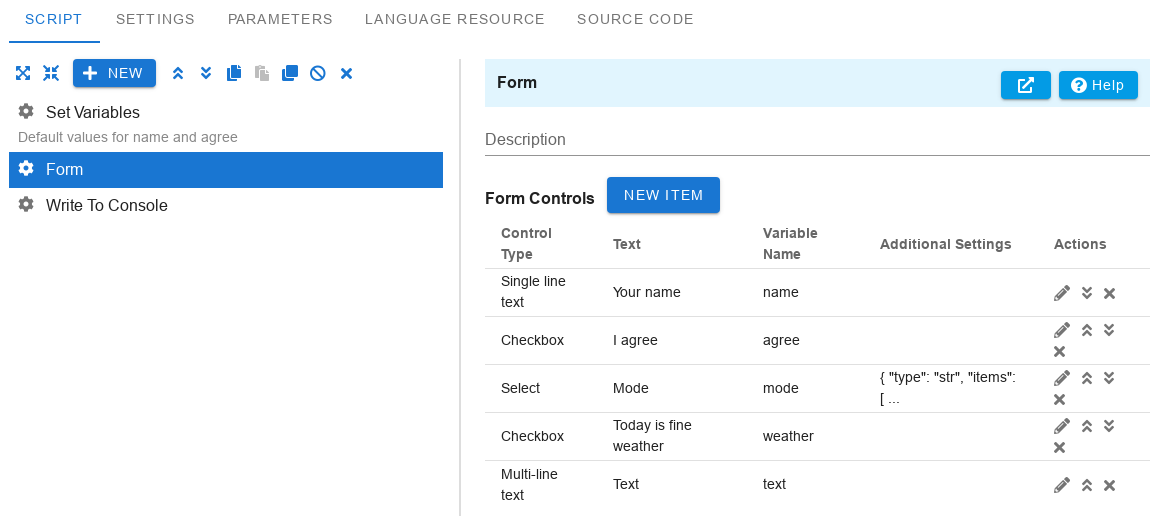
Form controls
You can add input fields and checkboxes to the form.
Control type
Specify the type of form element
- Single text. Single line input field.
- Checkbox.
- Multi-line text. Multiline input field.
- Select. Displays the combo box with your elements. They should be defined in the Additional settings field.
- HTML Text. It allows you to insert any HTML text into the form. In this case, the Text field remains empty, and the variable in the Variable Name field must contain HTML text.
- Button. Shows the button with the name from the Text field. The form can have several buttons. Form data is sent when any of the buttons is clicked. Each button must have a specified variable name. When the button is pressed, the corresponding variable is assigned true, and an empty line is assigned to the other buttons' variables. You can assign any value to a variable. To do it, specify it in the initial field in Advanced settings. You can also define the default field to be "true " if you want to highlight the button with a color. If you do not need to check the required fields when clicking on the button (for example, Skip), then specify the flags field equal to "skip".
1{
2    "initial": "mybutton",
3    "default": "true"
4}
-
Button link. Creates a button as a normal link. All features and settings are identical to the Button element described above.
-
Dynamic. You can generate a list of elements at runtime and show them using this type. To do this leave the Text field empty and the variable in the Variable Name field must contain a JSON string with the list of elements.
1[
2    {"type": "7", "var": "btn", "text": "#.retry#", "options": "{ \"initial\": \"retry\"}"},
3    {"type": "7", "var": "btn", "text": "#.abort#", "options": "{\"initial\": \"abort\"}"},
4    {"type": "7", "var": "btn", "text": "#.ignore#", "options": "{\"initial\": \"ignore\"}"}
5]
-
Password. An element of this type is used to enter passwords. All characters are hidden when you enter them. Also, the entered value is not written to the log file.
-
Checkbox List. This element displays a table with a checkbox for each row. In the Text field you should specify the name of the variable-object that contains an array of objects with two parameters: value and text. The text field contains the column header, and value is the name of the value field. In the Variable Name field specify the name of the object variable with an array of objects that will be displayed in the table. Each element of the array must have field names that correspond to the table columns. For example,
1// create a variable for describing the columns with the Parse JSON command
2[
3    {"value": "name", "text": "Name"},
4    {"value": "age", "text": "Age"},
5]
1// create a variable with the data with the Parse JSON command
2[
3    {"name": "John Doe", "age": "23"},
4    {"name": "Maria", "age": "18"},
5]
If you create and use these two variables, the form will display tables with two columns (Name and Age) and two records.
By default, after submitting the form, all unchecked elements in the variable array will be removed. If you do not want to delete elements, then you must add a field to the objects that will store the element's status. You also need to add a description only with the value parameter to the beginning of the column array.
1[
2    {"value": "checked"},
3    {"value": "name", "text": "Name"},
4    { "value": "age", "text": "Age"},
5]
1[
2    { "name": "John Doe", "age": "23", "checked": true},
3    { "name": "Maria", "age": "18"},
4]
In this case, elements with this field equal to true will be marked in the table. After submitting the form, all records will have the value of this field true (for the selected elements) or false.
If you want to show a list of checkboxes with one column, then the array can contain any objects (strings, numbers). In this case, leave the Text field blank.
Text
Description or name of the form element.
Variable name
The name of the variable bound to this element. If the variable is defined, then the element displays its current value. After submitting the form, the variable will be equal to the value specified by the user.
Additional settings
Here you can specify additional settings for form elements. These are described in Editor Parameters. You can also define the following parameters:
- if - you can hide elements depending on the value of the variable. Specify a variable name and the element will be hidden if the variable is undefined or equal to an empty string, "0" or "false " at the time the form is displayed. If you, on the contrary, want to show the element in such cases, add a negation symbol ! to the left.
1{"if": "myvar"} // show if bool(myvar) == true
2{"if": "!myvar"} // show if bool(myvar) == false
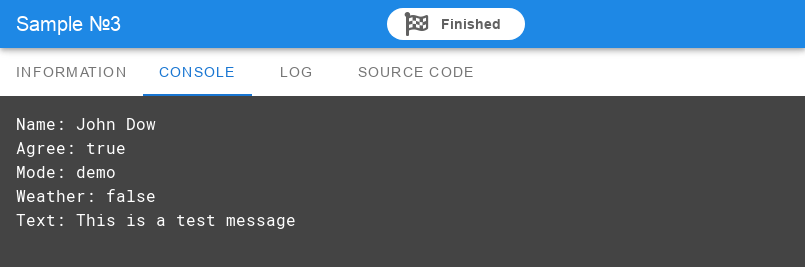
The result of the script